
Purpose
The purpose of this document is to define the setup process in Salesforce to create a connected app to receive lead data from Rollick Enterprise Lead Management System (ELMS).
Audience
This document is mainly intended for the business owners and the internal technical Salesforce support team.
Outbound Lead Integration Setup Steps
1. Account
Rollick uses Salesforce's OAuth 2.0 Username-Password Flow to securely authenticate and push lead data into your Salesforce instance. To enable this integration, a Connected App and dedicated Salesforce integration user must be configured. It is recommended that the Salesforce integration user account is one that wouldn’t have frequent use outside of the integration. Passwords can expire automatically through Salesforce; if possible, set this Salesforce user password to never expire.
2. Connected App (this will be for the mandated Salesforce authentication changes by summer of 2027)
A connected app will allow the Aimbase application to authenticate and push lead data into your Salesforce instance. The Connected App provides the OAuth credentials required for Rollick to authenticate with Salesforce to establish trust between systems.
- Log in to Salesforce as a System Administrator.
- Navigate to Setup → App Manager.
- Click New Connected App.
For more information, refer to Salesforce documentation found here.
When creating the app, fill out the information below:
- Connected App Name: Rollick Leads
- API Name: RollickLeads
- Contact Email: [enter a support email]
- Check Enable OAuth Settings [Check]
- Callback URL: https://localhost:8443/RestTest/oauth/_callback
-
Select OAuthScopes: Select these two scopes:
- Access and manage your data (API)
- Full access (full)
3. Create a Dedicated Salesforce Integration User
Create or designate a Salesforce user specifically for the Rollick lead integration. This user should not be used for regular day-to-day Salesforce activity.
The integration user should have:
- API Enabled permission
- Permission to create Leads
- Access to all Lead fields required for the integration
- An active Salesforce license
4. Send Security Token To Rollick
The OEM must provide a security token tied to integration user that was created in step 3.
To reset or obtain the token:
- Log in to Salesforce as the integration user.
- Go to Settings.
- Search for Reset My Security Token.
- Click Reset Security Token.
- Salesforce will email the new security token to the integration user's email address.
5. Provide The Following Credentials To Rollick:
- Salesforce Username
- Salesforce Password
- Salesforce Security Token
- Salesforce Environment:
- Production
- Sandbox
6. Lead Fields
- Create the required lead fields for the Aimbase Connector integration. Access the Build section under Setup – Build – Customize – Leads – Fields. There are two sections on this page, so be sure to select the New button in the Lead Custom Fields & Relationships section.
- Note, that the AimbaseIdentifier__c field will need to be setup as a computed field. This field should pull in and concatenate Aimbase_Instance_Name__c)-(AimbaseLeadId__c).
Example: aimbase_rollick-12345
For more information, refer to the Salesforce documentation here.
7. The Lead object serves as the primary object for receiving lead data transmitted from your Aimbase instance to Salesforce. The connector will send the fields listed below to Salesforce. While not all fields are required, it is highly recommended that they be added to the Lead object to support the full functionality of the integration.
To ensure proper record matching and updates, the OEM must configure the Salesforce External ID field and map it to the LeadUid__c field provided by Aimbase. The connector uses this External ID value during upsert operations to determine whether a lead already exists in Salesforce.
- If a matching External ID is found, the existing lead record will be updated.
- If no matching External ID is found, a new lead record will be created.
Proper configuration of the External ID field is required to prevent duplicate lead creation and ensure that lead data is accurately synchronized between Aimbase and Salesforce.
If any of the fields below are missing from the lead object, they need to be created prior to testing the integration.
Field Type |
Aimbase Field Name |
Length |
Salesforce Field Name |
Required |
Text |
LeadUid |
255 |
LeadUid__c |
X |
| Text | LeadId | 255 | AimbaseLeadId__c | X |
| Text | (your Aimbase instance name) | 255 | Aimbase_Instance_Name__c | X |
| Text | Computed field to concatenate Aimbase_Instance_Name__c - AimbaseLeadId__c | 255 | AimbaseIdentifier__c (i.e. aimbase_rollick-123456) |
|
Text |
Score |
255 |
Lead_Score__c |
|
Date |
LeadDate |
N/A |
Aimbase_Lead_Date__c |
|
Text |
LeadCategoryCode |
255 |
Lead_Category__c |
|
Text |
LeadTypeCode |
255 |
Aimbase_Lead_Type__c |
|
Text |
LeadSourceCode |
255 |
Aimbase_Lead_Source__c |
|
| Text | FollowUpStatusCode | 255 | Lead_Contact_Status__c | |
| Text | ProspectInterestCode | 255 | Prospect_Interest__c | |
| Text | PurchaseStatusCode | 255 | Purchase_Status__c | |
| Text | Product.BrandName | 255 | Make__c | |
| Text | Product.Name | 255 | Model__c | |
| Text | Product.ProductTypeCode | 255 | Product_Type__c | |
| Text | Product.ModelYear | 255 | Model_Year__c | |
| Text | Product.ProductCategoryFlattenedName | 255 | Product_Category__c | |
| Text | Customs[Comment] | 255 | Lead_Comments__c | |
| Text | Customs[Color] | 255 | Color__c | |
| Text | Customs[MSRP] | 255 | MSRP__c | |
| Text | Dealer.Name | 255 | Dealer_Name__c | |
| Text | Dealer.DealerNbr | 255 | Dealer_Number__c | |
| Text | Prospect.ProspectAggregationId | 255 | Prospect_Agr__c | |
| Text | LeadStatusCode | 255 | Status (SF Standard Field) | |
Text |
Prospect.FirstName |
255 |
FirstName (SF Standard Field) |
|
Text |
Prospect.LastName |
255 |
LastName (SF Standard Field) |
|
Text |
Prospect.Email |
255 |
Email (SF Standard Field) |
|
Text |
Prospect.Id |
255 |
Company (SF Standard Field) |
|
Text |
Prospect.Address |
255 |
Street (SF Standard Field) |
|
Text |
Prospect.City |
255 |
City (SF Standard Field) |
|
Text |
Prospect.State |
255 |
StateCode (SF Standard Field) |
|
Text |
Prospect.PostalCode |
255 |
PostalCode (SF Standard Field) |
|
Text |
Prospect.Country |
255 |
Country (SF Standard Field) |
|
Text |
Phone.MobilePhone |
255 |
Phone (SF Standard Field) |
|
| Text | Prospect.HomePhone | 255 | Home_Phone__c | |
| Text | Prospect.WorkPhone | 255 | Work_Phone__c |
Inbound Lead Integration Setup Steps
The basis for sending the disposition back to Aimbase is an outbound message. There are (2) objects that need to be setup.
- Lead Object or Opportunity Object, pending on how your Salesforce account is setup. This object is used to capture the lead status changes in Salesforce and send back to Aimbase.
- Activity Object that is used to capture the activity that is happening on the lead. i.e. call, notes, email, appointment etc.
- Note, that the values for Lead/Opportunity and Activity object will need to be provided to the COE so the values can be mapped to a standard set in Aimbase.
Prior to sending disposition, please provide list of activities and statuses that Rollick should expect. Rollick will handle mapping your values to the Rollick values listed below. This mapping must be completed prior to sending disposition to the QA or production endpoint. If there are any values that would fall outside of this mapping, we would still like to see examples to consider creating a new activity or status.
- Activities
- Call
- Text
- Note
- Appointment
- Quote
- Status:
- Viewed
- Assigned
- Working
- Sold
- Lost
Lead Object Setup
In order to send the disposition to Aimbase an outbound message will be set up and triggered either by a workflow rule or process builder based upon preference (including example of workflow rule below). The lead id will be important in order to connect the disposition to the specific lead.
Setting up the outbound message:
- Go to Salesforce Set up
- Go to Outbound messages (in workflow actions)
- Select New
- Name (Disposition to Aimbase)
- Select the fields that need to be passed to Aimbase
- Set endpoint URL to:
- https://crmintegrationqa.aimbase.net/api/Disposition?source=SF (For QA)
- https://crmintegration.aimbase.net/api/Disposition?source=SF (For Production)
- Save
Fields to include in the outbound message:
| Selected Field | Type | Notes |
|---|---|---|
OrganizationId |
Standard Field | Salesforce account identifier |
ActionId |
Standard Field | The workflow rule (action) that triggers the message |
| SessionId | Standard Field | Unique Id of session |
| EnterpriseUrl | Standard Field | Salesforce account URL |
| PartnerUrl | Standard Field | Salesforce account URL |
| Id | Standard Field | This is the Lead or SF object that the activity is tied to. |
| IsUnreadByOwner | Standard Field | Indicates if lead has been read. true/false. |
| LastModifiedDate | Standard Field | Date the lead was last modified |
| LeadUid | Custom Field | Aimbase unique identifier to match back to lead. i.e. aimbase_rollick-123456 |
| AimbaseIdentfier__c | Custom Field | Aimbase unique identifier to match back to lead in Aimbase i.e. aimbase_rollick-12345 |
| Status | Standard Field | The status of the lead |
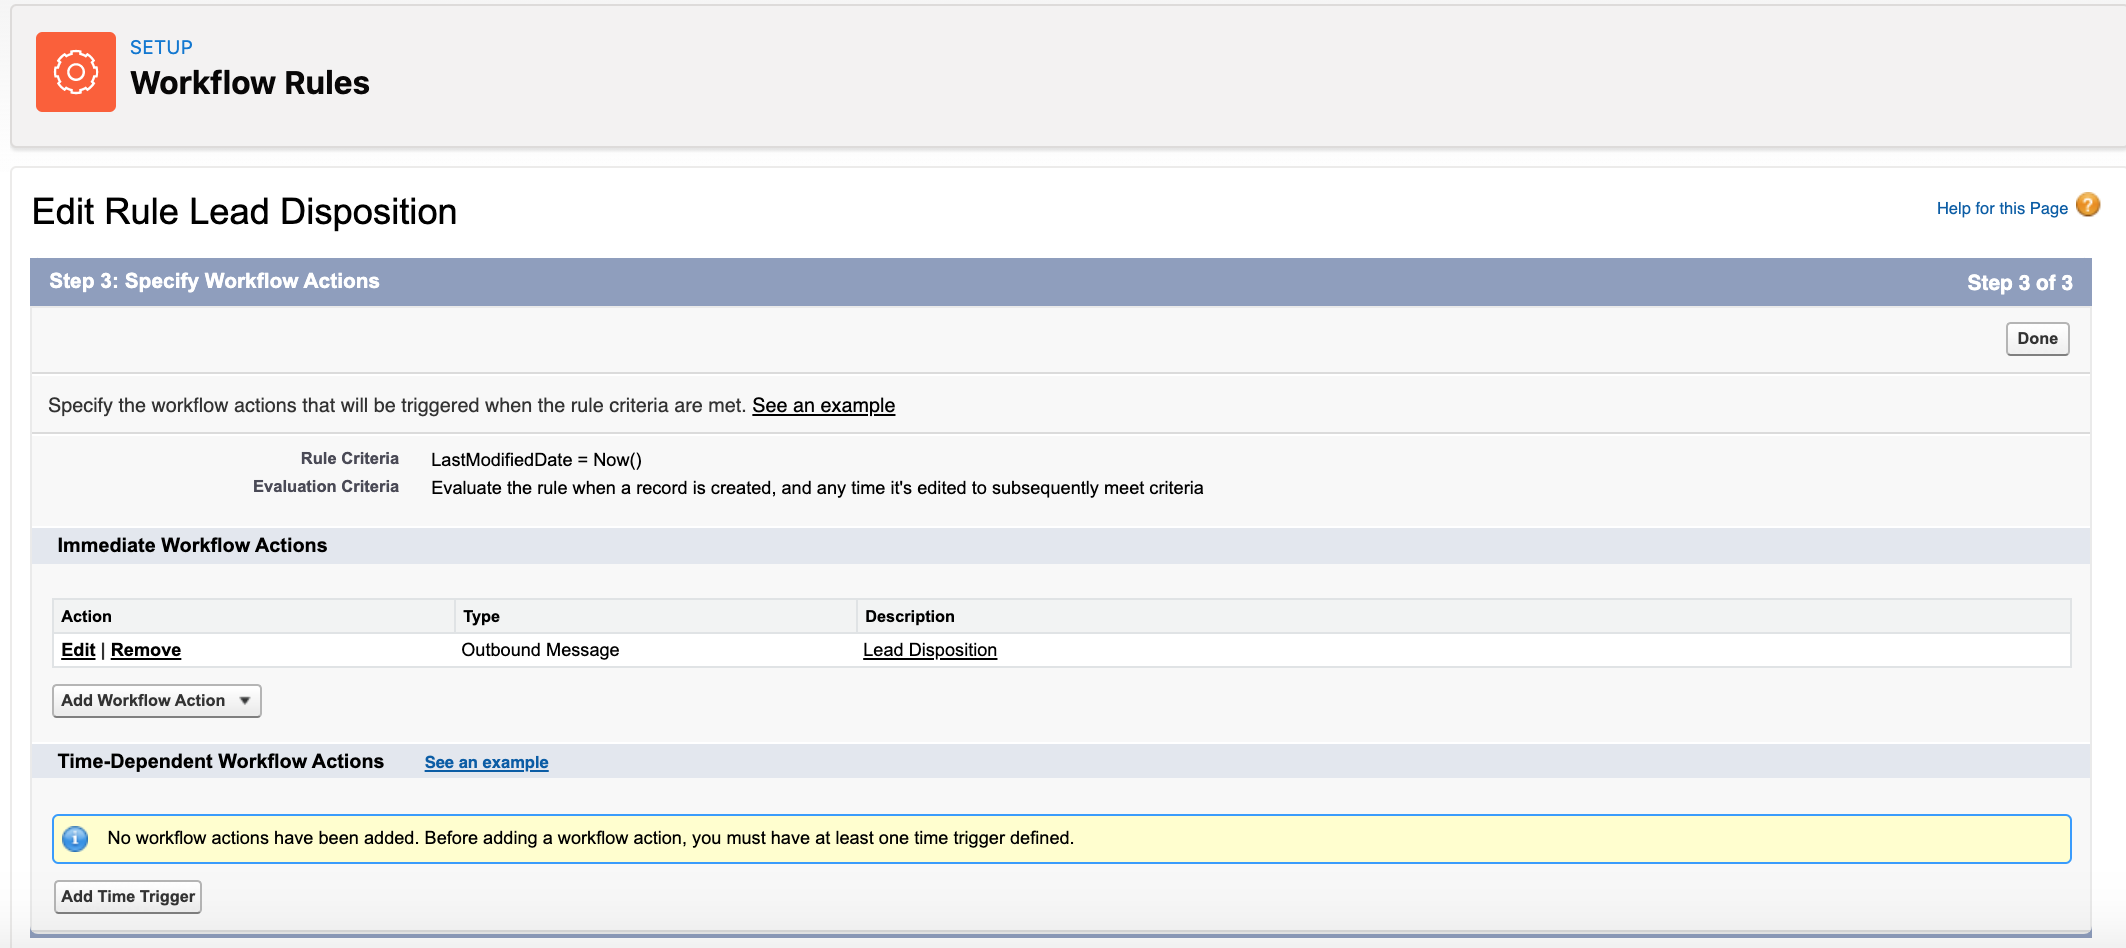
8. Workflow setup.
Based upon your business rules a workflow rule or process should be set up to trigger the message to send the activity to Aimbase.
- Go to Set Up
- Select Workflow Rules
- Determine criteria and enter via criteria or formula (example: activity is of certain type and status)
- Add workflow action and select outbound message
- Activate workflow rule
Once steps are done, once the activities are created and meet the appropriate criteria then the outbound message will be triggered to Aimbase. The activities would then be visible in the Customer Tab under Concierge Calls.
Example rule: trigger when record modified, or when status changes.
Opportunity Object Setup
In order to send the activity to Aimbase an outbound message will be set up and triggered either by a workflow rule or process builder based upon preference (including example of workflow rule below). The prospect Id's will be important in order to connect the activity to the customer.
Setting up the outbound message:
- Go to Saleforce Set up
- Go to Outbound messages (in workflow actions)
- Select New
- Name (Activity to Aimbase)
- Select the fields that need to be passed to Aimbase
- Set endpoint url to:
- https://crmintegrationqa.aimbase.net/api/Disposition?source=SF (For QA)
- https://crmintegration.aimbase.net/api/Disposition?source=SF (For Production)
- Save
Fields to include in the outbound message:
| Selected Field | Type | Notes |
|---|---|---|
| OrganizationID | Standard Field | Date/Time of Activity |
| ActionId | Standard Field | Standard field that will send over the detail of the call |
| SessionId | Standard Field | This will be a static value provided by Rollick. A field will need to be created on activity and when activity is added, that value should pass through |
| EnterpriseUrl | Standard Field | Upon creation of the activity, this will need to be passed to the activity so we can pass that value to aimbase. |
| PartnerUrl | Standard Field | This is the account or object that he activity is tied to. |
| Id | Standard Field | * If relevant. If desire is to create the connection to a specific Dealer |
| IsUnreadByOwner | Custom Field | |
| LastModifiedDate | Standard Field | |
| LeadUid | Custom | Aimbase unique identifier to match back to lead. i.e. aimbase_rollick-123456 |
| AimbaseIdentifier__c | Custom Field | Aimbase unique identifier to match back to a lead in Aimbase i.e. aimbase_rollick-12345 |
| StageName | Standard Field | Activity of the task |
8. Workflow setup.
Based upon your business rules a workflow rule or process should be set up to trigger the message to send the activity to Aimbase.
- Go to Set Up
- Select Workflow Rules
- Determine criteria and enter via criteria or formula (example: activity is of certain type and status)
- Add workflow action and select outbound message
- Activate workflow rule
Once steps are done, once the activities are created and meet the appropriate criteria then the outbound message will be triggered to Aimbase. The activities would then be visible in the Customer Tab under Concierge Calls.
Activity Object
In order to send the activity to Aimbase an outbound message will be set up and triggered either by a workflow rule or process builder based upon preference (including example of workflow rule below). The prospect Id's will be important in order to connect the activity to the customer.
Setting up the outbound message:
- Go to Saleforce Set up
- Go to Outbound messages (in workflow actions)
- Select New
- Name (Activity to Aimbase)
- Select the fields that need to be passed to Aimbase
- Set endpoint url to:
- https://crmintegrationqa.aimbase.net/api/Disposition?source=SF (For QA)
- https://crmintegration.aimbase.net/api/Disposition?source=SF (For Production)
- Save
Fields to include in the outbound message:
| Selected Field | Type | Notes |
|---|---|---|
| ActivityDate | Standard Field | Date/Time of Activity |
| LeadUid | Custom Field | Aimbase unique identifier to match back to lead. i.e. aimbase_rollick-123456 |
| Subject | Standard Field | Details of the acitivity |
| Type | Standard Field | Type of activity |
Workflow Rule
Based upon your business rules a workflow rule or process should be set up to trigger the message to send the activity to Aimbase.
- Go to Set Up
- Select Workflow Rules
- Determine criteria and enter via criteria or formula (example: activity is of certain type and status)
- Add workflow action and select outbound message
- Activate workflow rule
Once steps are done, once the activities are created and meet the appropriate criteria then the outbound message will be triggered to Aimbase. The activities would then be visible in the Customer Tab under Concierge Calls.
Deliverables
The instance name, client id, client secret need to be sent over to Rollick in order to complete the Connector integration configuration with Salesforce.
Testing
Once the custom app configuration is complete, and the integration is enabled, test leads should be sent. Coordination between teams is necessary to confirm that all fields were transferred through the integration and the fields were mapped correctly.